VCP
1. What is VCP?
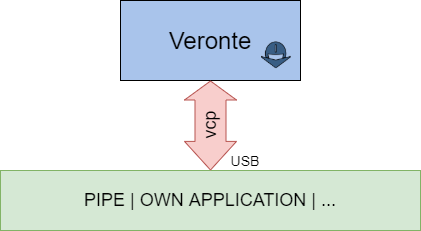
VCP is the abbreviation for Veronte Communication Protocol. This Protocol allows the user to “understand” Veronte messages and, in the same way, send messages which Veronte will interpret correctly. In other words, this protocol is essential if we want to talk with any Veronte-based device.
This protocol is used in Veronte Pipe, but it can be used in an own developed application as we can see in the following image:
2. Requirements
To test the VCP library, Embention team have prepare some easy examples to understand how use it. But, first, we need some requirements:
VCP library
A device running Windows 10
Visual Studio 2015 installed
A Veronte-based system
An Autopilot Harness
3. Getting Started
Firstly, we will connect Veronte to our PC running Windows across the USB port. For electronic specifications, go to Veronte Autopilot.
In the following image we can see an example of connection:
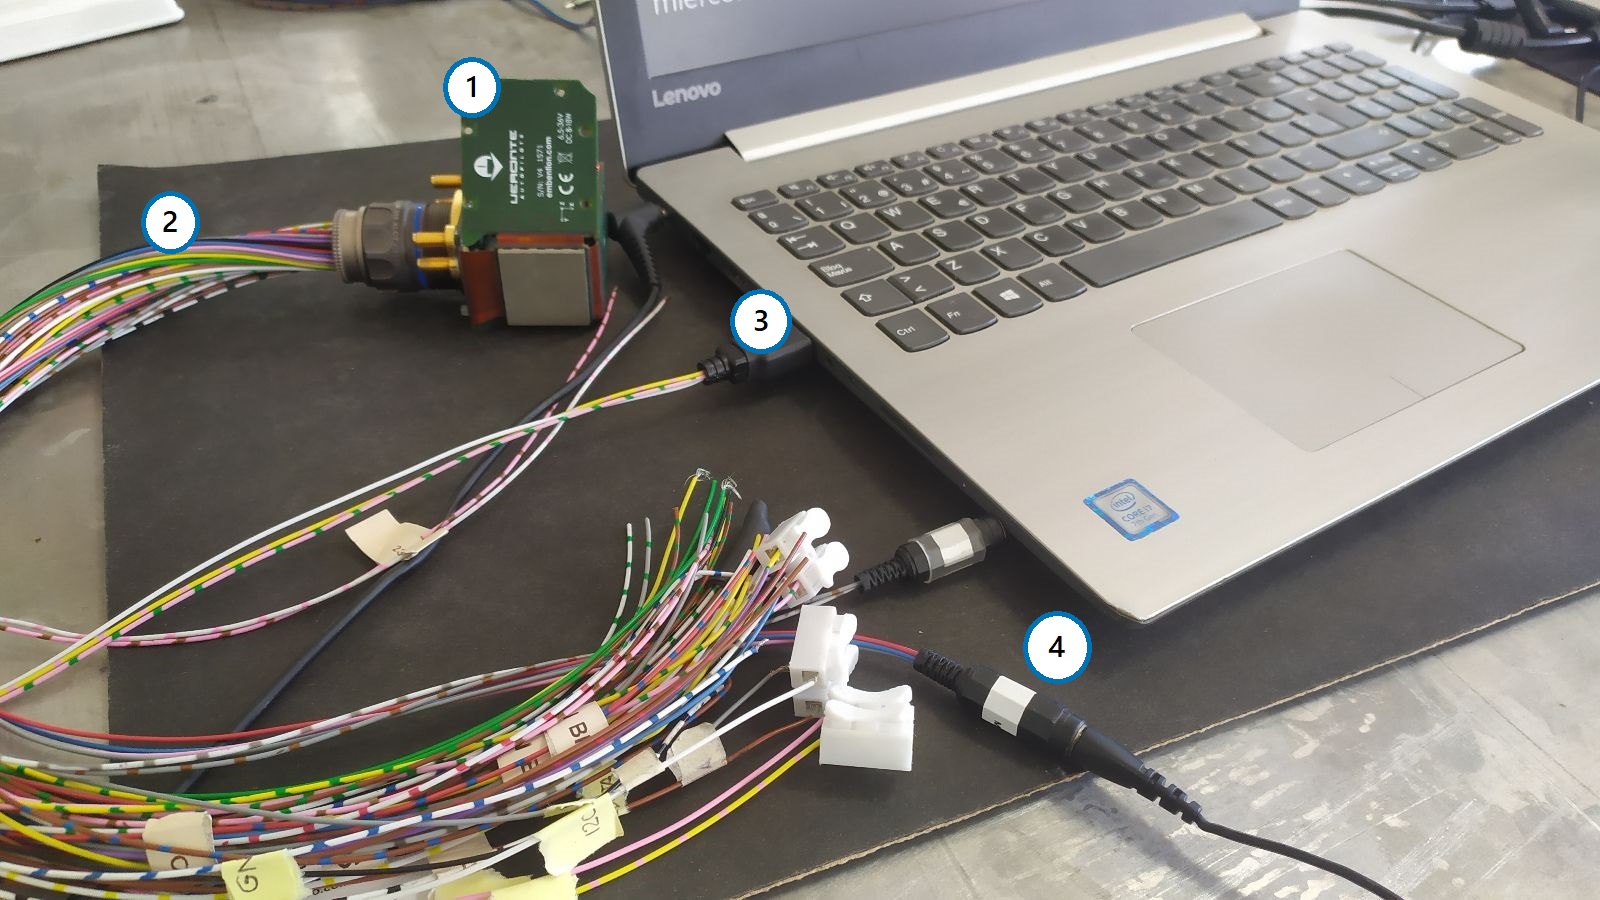
Where:
Veronte Autopilot
Veronte Harness
USB connected to PC
Vcc
Our PC will assign a COM port to Veronte, which we can check on Device Manager as follow:
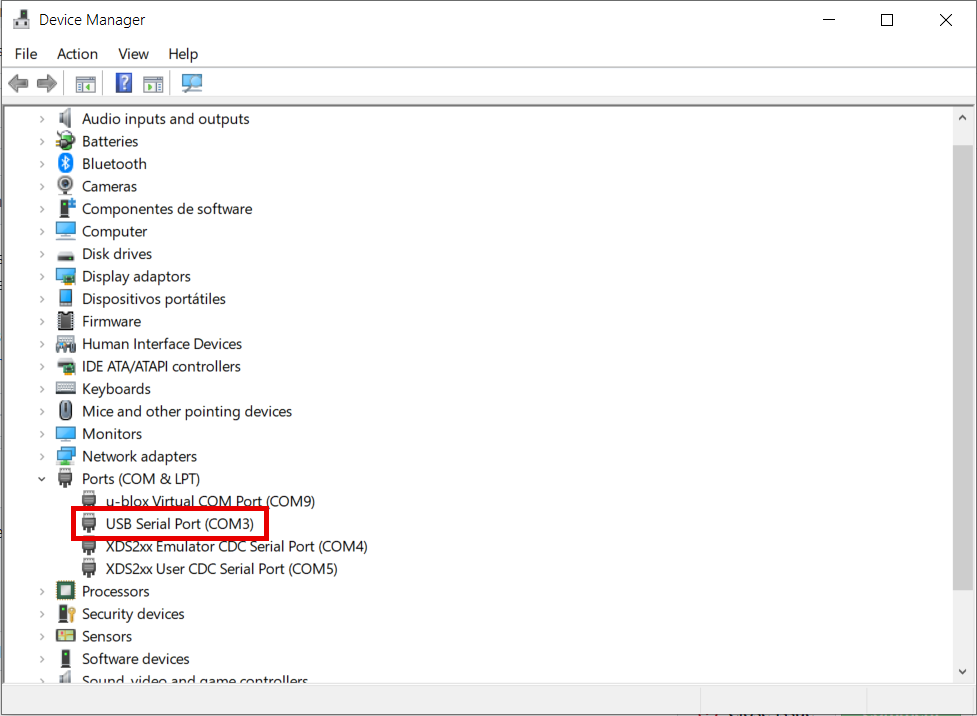
Make sure veronte is not in maintenance mode
Now, we are ready to launch the examples.
4. Veronte Communication Protocol
Firstly, it is important do a little overview about VCP. For example, which is the shape of VCP messages? The structure of the messages between different elements within a Veronte-based system is as follows:
Field: |
0xBA |
UAV Org |
UAV Dest |
Ener Flag |
IRX |
Arg |
Len |
CRC |
Data |
CRC |
Bytes: |
1 |
2 |
2 |
1-bit |
7-bit |
1 |
1 |
1 |
0-255 |
2 |
The first byte is the header of the message, used to identify an incoming communication as a Veronte message. The following four bytes are the ID addresses, origin and destination respectively.
One of the most important fields for the user is IRX, plus its Argument, where the IRX refers to the command type and the Argument depends on the action to perform. IRX field could be:
0x00: Telemetry messages
0x0F: Stick interface
0x22: Communication Statistics
0x29: Configuration Commands
0x2C: Simulated Navigation
0x2E: Simulated Sensor
0x05: Configuration Files
This message structure is all we need to send and receive information from Veronte.
5. Examples
5.1. Common Code
5.1.1. Serial Port
Get the serial COM port used by Veronte and asigned by our PC as below, and its initialisation (Specify your assigned COM port as project argument: Project -> Properties -> Debugging -> Command Arguments):
Serial& serial = Serial::get_instance();        //Serial port instance
const char* port = Serial::get_default_port();  //Get default port
if (argc == 2)                                  //Checks if the user has specified a COM port
{
   port = argv[1];                              //Get port as argument
}
serial.init(port);                              //Inits serial port
5.1.2. Discovery step
In this step we add the discovery IRX in the command manager to discover the address ID of Veronte connected to our PC.
Base::Commgr commgr(myaddr);                    //Command manager instance
Media::Discovery discovery(commgr);             //Discovery instance
commgr.add_irx(Base::discovery_id, discovery);  //IRX addition to Command Manager
After this, it is possible to discover our Veronte and its ID:
discovery.discover();                              //Discover action
while (!discovery.get_status().received)           //Wait until the veronte has been discovered
{
   discovery.discover();
   VCP::send_receive(serial, commgr);              //Updating serial bus
}
Uint16 ver_addr = discovery.get_status().addr.id;  //ver_addr is the Veronte Address ID.
This ver_addr will be used by many examples as destination address.
5.2. File Configuration
With the veronte ID, it is possible to change its configuration, for example, in this case we will update the route which the UAV will follow. (This example only shows one point update, go to main_cfg.cpp file to check all code)
Feature references creation:
Geo::Ftropf fop;                  //Operation features instance
Base::Feature f0;                 //Feature reference instance
Rv3_64 v0;                        //3D array

v0[0] = -0.01001664582567;        //longitude
v0[1] = 0.66831910249822;         //latitude
v0[2] = 150;                      //height

f0.set_abs(v0);                   //Sets the coordinates of a waypoint from its absolute coordinates
fop.opg[0] = f0;                  //Initialize the list of operation generic features

fop.opg.set_enabled(0, true);     //Enables the abstract array
Route creation:
Base::Patchset_route route;
route.route.set(static_cast<Troute::Pnt_index>(0), Fid::opg_000);
route.route.set_enabled(static_cast<Troute::Pnt_index>(0), true);
route.route.set(static_cast<Troute::Pch_index>(0),
            static_cast<Troute::Pnt_index>(0),
            static_cast<Troute::Pch_index>(-1));
route.route.set_enabled(static_cast<Troute::Pch_index>(0), true);
File Configuration IRX and Config Manager IRX instances, and their addition to the Command Manager:
Media::Filecom filecom(commgr, myaddr, discovery.get_status().addr, 5.0F);  //File Configuration instance
Base::Cfgmgr cfgmgr(commgr, myaddr, discovery.get_status().addr, 5.0F);     //Configuration manager instance

commgr.add_irx(Base::filecom_id, filecom);                                  //IRX addition to Command Manager
commgr.add_irx(Base::config_id, cfgmgr);
Updating route configuration:
//Random identification number of the file transaction
Uint64 uuid_file = rand();
//67 will be interpreted by Veronte as a route change request
if (filecom.send(route, 67, uuid_file)
       && cfgmgr.save(uuid_file, 67))       //File configuration sending and saving configuration
{
   bool sending_file = true;
   while (sending_file)
   {
      VCP::send_receive(serial, commgr);    //Serial bus refresh

      if (!filecom.step()
                && filecom.is_successful())
      {
         sending_file = cfgmgr.step();      //True when the whole file messages transactions have finished
      }
   }
}
Feature references manager update:
//79 will be interpreted by Veronte as a feature references change request
if (filecom.send(fop, 79, uuid_file) && cfgmgr.save(uuid_file, 79))
{
   bool sending_file = true;
   while (sending_file)
   {
      VCP::send_receive(serial, commgr);

      if (!filecom.step() && filecom.is_successful())
      {
          sending_file = cfgmgr.step();
      }
   }
}
Finally, we change to phase 0 to test this command using the command manager instanced in Discovery step code.
build_phasecmd(cfgmgr, 0);                  //Builds change phase command
bool sending_cmd = true;
while (sending_cmd)
{
   VCP::send_receive(serial, commgr);
   sending_cmd = cfgmgr.step();
}
5.2.1. Command Prompt
File configuration output:

5.3. Telemetry
Telemetry is sent by default by Veronte, this means it is not necessary create a particular packet to send to Veronte. Of course, it is essential add the IRX to command manager as in filecom example, but in this case we will add the telemetry IRX:
Base::Commgr commgr(source_address);                 //Command manager instance
Telemetryrx irx1(0, source_address);                 //Telemetry IRX instance
commgr.add_irx(Base::telemetry_id, irx1);            //IRX addition
Uint8 data;                                          //Variable to send/receive
while(true)
{
   if( serial.read(data) )                           //Read from serial port
   {
      commgr.ports.eports.get_port8().write(data);   //Write in port for byte producer/consumer side
   }
}
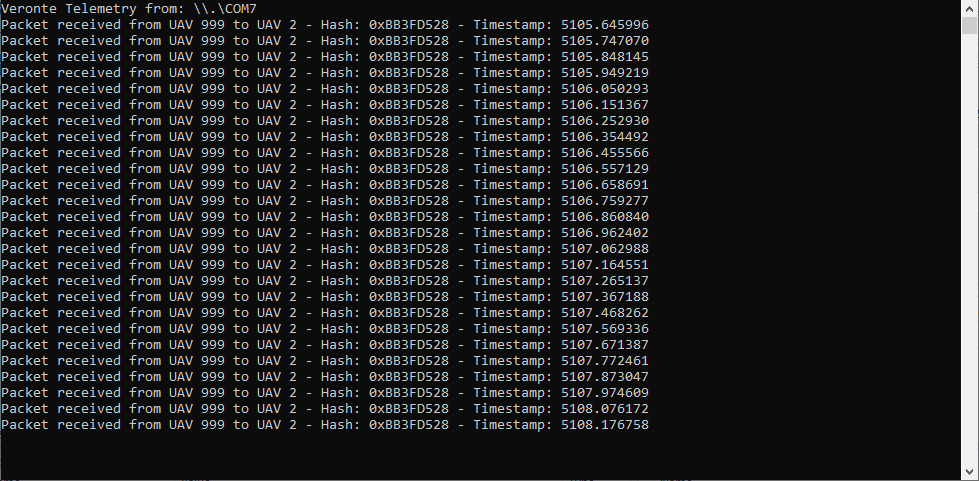
Launching this example we will see in the command prompt:
Packet received from UAV XX to UAV XX - Hash: XX - Timestamp: XX
or
Packet ignored from UAV XX to UAV XX - Hash: XX - Timestamp: XX
depending on the correct or incorrect telemetry reception.
5.3.1. Command Prompt
Telemetry output:
- Version
UM.307.6.2.38
- Date
2023-01-30